What colours are these bottles, how are they stored, transport when refilling them
Pressure gauges?
welding hoses?
Welding torch?
welding tips?
Flashback arrestors?
What flames are used for different metals?
How to Identify the difference:
Oxygen:
The oxygen cylinder is coloured black, and has a tall thin casing. The threads for attaching the pressure gauge are right handed, same as hose connections. Bottled oxygen is used for welding purposes and cannot be used as a substitute for compressed air. The hose for these are either blue or black in colour.

Image from: http://www.meg.co.uk/courses/q1.php
Acetylene:
The acetylene bottles are usually shorter than Oxygen bottles and a lot rounder in diameter. They are coloured maroon so that you can tell that it is different from the oxygen cylinder. These bottles are under pressure, generally 100Kpa or 15Psi. The threads on these cylinders are left handed, same as connections for that specified cylinder. The hose for acetylene cylinders are usually red and the bottles must be shut off after every use.

Image from: http://www.zsqts.com.cn/Acetylene-cylinder-p-132484
Transportation:
If you are using/have a portable gas welding plant:
Both cylinders must be chained/securely fastened to the trolley/carrier. If it is a fixed welding plant, make sure both cylinders are standing up and/or secured, it doesn't generally matter if the oxygen bottle lies on its side or sits straight up as the compressed air is not explosive and wont explode when the tip is knocked. Never put oil or grease on the threads of gauges or regulators as this can cause an explosion. Always leave a bottle key cylinder valve as this helps make it easier to turn off in the event of a fire or flashback. Always turn these off after use.
An Oxygen cylinder on a trolley which is secured by a chain:

Pressure gauges:
There are two parts to pressure regulators: one gauge shows the amount of pressure in the bottle, where the other gauge shows the amount of pressure in the hose/gas line. these devices are sensitive and cant handle much tampering. During set up and close down, you must always turn on/off the line pressure of the acetylene first, as this this is the fuel for the flame. Set up and closing down will be explained further bellow these sentences.

Image from: http://www.tradevv.com/chinasuppliers/lhpressuregauge_p_1905df/china-Welding-CO2-PRESSURE-REGULATOR.html
Welding hoses:
The hoses in gas welding are very specific and simple. one is black or blue with a right handed thread which is used for the oxygen bottle, where the acetylene hose is red with a left handed thread made just for that specific bottle. it will be impossible to get these two mixed up as their threads are very specific and wont attach to the other bottle. For example: If you try to the acetylene hose on the oxygen bottle, the opposing threads will disallow the two ends to connect.
Oxygen welding hose

Image from: http://zhudajin.en.made-in-china.com/offer/ZqImXeiDhAYp/Sell-Oxygen-Welding-Hose.html
Acetylene welding hose

Image from: http://www.air-compressor-hose.com/product_3841_WELDING_HOSE_TWIN_AND_SINGLE_FOR_OXYGEN_AND_ACETYL.html
Setting up and closing down:
durring set up:
. Ensure that the bottle pressures are at the correct pressure (acetylene would be at 15Psi)
. Turn on the acetylene line pressure tap one and a half turns
. Open the valve tap on the torch half a turn.
. Adjust the pressure regulator until the gauge indicates the desired pressure.
. When you have checked that you are at the desired pressure, close the valve on the torch.
. The same procedure applies to the oxygen as well.
. Once you have done all this, you may commence with your project/work.
Closing down:
. Turn off the acetylene tap on the torch to put out the flame.
. turn the oxygen of at the torch. You can leave it like this for a break but never leave it like this when you officially finish and should really be done if you intend on being away for a long time.
. Turn off the line pressure for both cylinders, starting with the acetylene first.
. Open the oxygen on the torch to release the line pressure. When the gauge reads zero turn the valve on torch off.
. Release the pressure on the regulator diaphragm.
. Do exactly the same of the acetylene.
Welding torch:
A welding torch head is used to weld metals. It can be identified by having only one or two pipes running to the nozzle and no oxygen-blast trigger and two valve knobs at the bottom of the handle letting the operator adjust the oxygen flow and fuel flow.
Info from: http://en.wikipedia.org/wiki/Oxy-fuel_welding_and_cutting#Welding_torch

Image from: http://en.wikipedia.org/wiki/Oxy-fuel_welding_and_cutting#Welding_torch
Welding tips:
The size of the flame can be adjusted to a limited extent by the valves on the torch and by the regulator settings, but in the main it depends on the size of the orifice in the tip. In fact, the tip should be chosen first according to the job at hand, and then the regulators set accordingly.
Info from: http://en.wikipedia.org/wiki/Oxy-fuel_welding_and_cutting#Types_of_flame

Image from: http://www.chinawholesaletown.com/wholesale-Welding-Torch/
Flash back arrestors:
A flashback arrestor or flame arrestor is a device most commonly used in oxy-fuel welding and cutting to stop the flame from burning back up into the equipment and causing damage or explosions. The two main types are dry and wet. Each has its own advantages and disadvantages. Most oxy-fuel flashback arrestors are the dry type
Info from: http://en.wikipedia.org/wiki/Flashback_arrestor

Image from: http://en.wikipedia.org/wiki/Flashback_arrestor
Flashback arrestor-Dry type:
Dry flashback arrestors typically use a combination of methods to stop flashback. This is the type that is typically found on most workshops, home or portable oxy-fuel kits as they work just as effectively with any orientation, need very little maintenance, and are often small and light enough to be installed between the torch and hoses. They include:
- Flame trap to cool the flame front. They are designed to allow free flow of gas through them but to take the heat out of the flame front to get it below the ignition temperature of the burning gas mixture. The most common types are:
- Sintered metal or ceramic.
- Layers of mesh.
- Ceramic beads.
- Temperature-triggered valves to stop the gas flow completely. Because it relies on extracting heat from the flashback to stop it continuing, most arrestors have a temperature-controlled valve that will cut off the gas flow when the unit reaches around 90°C, until either the unit cools (if the unit is automatic) or the reset button is pressed (if the unit is manual).
- A check valve that closes due to the back pressure.
A video found on YouTube showing a dry flash back arrestor (intense sound):
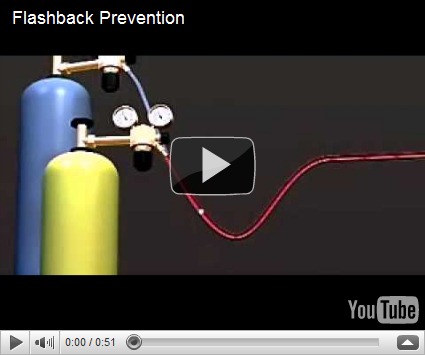
Info from: http://en.wikipedia.org/wiki/Flashback_arrestor

Image from: http://www.procut.cz.cc/regulator—.html
Flashback arrestors-Wet:
Liquid seal flame arrestors are liquid barriers following the principle of a siphon where the liquid stops the entering deflagration and/or detonation and extinguishes the flame, they work by bubbling the gas through a non-flammable and ideally non-gas-absorbing liquid, which is typically water. They stop the flame by preventing it from reaching the submerged intake. These devices are normally very effective at stopping flashbacks from reaching the protected side of the system. They have the disadvantages of only working in one orientation and tend to be much larger than dry type arrestors. This makes them mainly only suitable for large or fixed installations and the liquid level needs to be constantly checked. On smaller units having a pressure release valve to prevent the unit from bursting under a severe flashback, the fluid level should be monitored to keep it always above the intake and not so high that the liquid could splash or overflow into the outlet.
Info from: http://en.wikipedia.org/wiki/Flashback_arrestor

Image from: http://en.wikipedia.org/wiki/Flashback_arrestor
What flames are used for different metals?
There are three types of flames: Carbonising, Oxidising, and Neutral.
The neutral flame is the flame most generally used when welding or cutting. The welder uses the neutral flame as the starting point for all other flame adjustments because it is so easily defined. This flame is attained when welders slowly open the oxygen valve on the torch body, first see only two flame zones. At that point, the acetylene is being completely burned in the welding oxygen and surrounding air. The flame is chemically neutral. The two parts of this flame are the light blue inner cone and the darker blue to colourless outer cone. The inner cone is where the acetylene and the oxygen combine. The tip of this inner cone is the hottest part of the flame. It is approximately 6,000 °F (3,300 °C) and provides enough heat to easily melt steel. In the inner cone the acetylene breaks down and partly burns to hydrogen and carbon monoxide, which in the outer cone combine with more oxygen from the surrounding air and burn.
Info from: http://en.wikipedia.org/wiki/Oxy-fuel_welding_and_cutting#Types_of_flame

Image from: http://www.twi.co.uk/content/jk3.html
Carbonising flame:
An excess of acetylene creates a carbonizing flame. This flame is characterized by three flame zones; the hot inner cone, a white-hot "acetylene feather", and the blue-collared outer cone. This is the type of flame observed when oxygen is first added to the burning acetylene. The feather is adjusted and made ever smaller by adding increasing amounts of oxygen to the flame. The unburned carbon insulates the flame and drops the temperature to approximately 5,000 °F (2,800 °C). The reducing flame is typically used for hardfacing operations or backhand pipe welding techniques. The feather is caused by incomplete combustion of the acetylene to cause an excess of carbon in the flame. Some of this carbon is dissolved by the molten metal to carbonize it. The carbonizing flame will tend to remove the oxygen from iron oxides which may be present, a fact which has caused the flame to be known as a "reducing flame".
Info from: http://en.wikipedia.org/wiki/Oxy-fuel_welding_and_cutting#Types_of_flame

Images from: http://www.twi.co.uk/content/jk3.html
Oxidising flame:
The Oxidizing flame is the third possible flame adjustment. It occurs when the ratio of oxygen to acetylene required for a neutral flame has been changed to give an excess of oxygen. This flame type is observed when welders add more oxygen to the neutral flame. This flame is hotter than the other two flames because the combustible gases will not have to search so far to find the necessary amount of oxygen, nor heat up as much thermally inert carbon. It is called an oxidizing flame because of its effect on metal. This flame adjustment is generally not preferred. The oxidizing flame creates undesirable oxides to the structural and mechanical detriment of most metals. In an oxidizing flame, the inner cone acquires a purplish tinge, gets pinched and smaller at the tip, and the sound of the flame gets harsh. A slightly oxidizing flame is used in braze-welding and bronze-surfacing while a more strongly oxidizing flame is used in fusion welding certain brasses and bronzes.
Info from: http://en.wikipedia.org/wiki/Oxy-fuel_welding_and_cutting#Types_of_flame

Image from: http://www.twi.co.uk/content/jk3.html
Some info referred from: http://perrinshovel.blogspot.com/search?updated-max=2011-05-18T15%3A01%3A00%2B12%3A00&max-results=7


 The extinguisher is not blocked by equipment, coats or other objects that could interfere with access in an emergency.


